List of Topics
- introduction
- editing personal data
- customer's info
- customer's purchases
- classes and access records
- cards, bank details and skills
1. Introduction
The user profile is a space where the customer's personal data and info about their activity are collected.
This manual shows where to find the different types of data within the user profile.
2. Editing Personal Data
The EDIT button under the profile picture redirects to the customer's personal data, which can be viewed and edited anytime. To know more, please refer to the following manual: Creation of a User Profile.
3. Customer's Info
Left-Hand Side of the User's Profile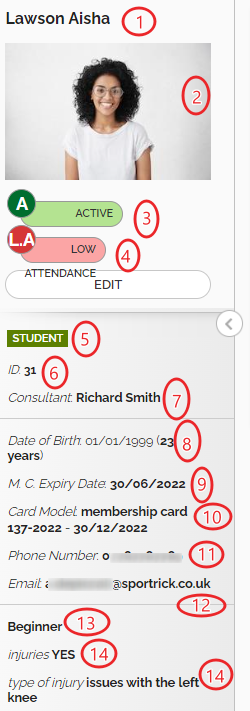
1) Surname and Name
2) Picture (click on the silouhette to upload the customer's picture. More info in the following manual: How to add a picture to the user profile)
3) Status: this info is automatically updated by the system:
- Former Customer
- Potential Customer: the client hasn't purchased anything so far
- Active: the client has purchased a multipack/enrolled into a course that is still hasn't expired
Please note that the status cannot be customised. Should the necessity arise, you can always use tags;
4) Attendance: from the VAR portal it is possible to activate the attendance indicator which will display the following values:
- high
- medium
- low
the displayed value will vary automatically according to how frequently the customer shows up at the club, based on the avarage number of times their access has been recorded in the last 90 days.
To enable this info, after logging onto the VAR portal click on Managed Environments -> View More -> Configurations -> Settings -> type in the search field the code 10087 corresponding to the following option: View Customer Club Frequency, cliccare su Modify e deselezionare "use default value" per poi mettere la spunta su Yes e cliccare su OK;
5) Tags assigned to the user (more info here)
6) Customer ID: progressive number assigned automatically to the user's profile
7) Consultant: person responsible for the client. The consultant has to be created from Settings -> User Management before being able to assign it to a user profile (as described in the following manual: How to assign a consultant). Should it be necessary to assign more than one consultant, please configure additional fields
8) Date of Birth (the system automatically calculates the customer's age)
9) Medical Certificate Expiry Date (it will only show if a date has been specified)
10) Card Model: number of the customer's membership card (for affiliation purposes only, nothing to do with access control). To assign a card, please refer to the manual: How to Assign a Card Model
11) Telephone Number
12) Email
13) Skills acquired while taking part in a didactic course. Please refer to the following manual to know how to assign skills to the user: How to Assign Skills to a Customer
14) Information provided in the additional fields (please refer to the manual to know how to customise additional fields).
Right-Hand Side of the User's Profile
General: useful info about the customer's activity | |
 | Outstanding amount to pay Last Access of the Customer Expiry of the customer's multipacks or enrolments. In case of more than one active object, the reference will be the subscription with the latest termination date Classes the customer is supposed to attend within a thirty-day time frame Number of passes left (in case of multipacks that require the deduction of credit for booking/access) e-Wallet credit: amount available in the e-wallet of the customer. This info will only show if the customer has purchased a top-up. Please refer to the following manual: |
Shortcuts: quick buttons to carry out various operations | |

Assign card: click on the button and scan the proximity card that will be assigned to the user to access the facility. For more info click here
Assign IBAN: please refer to the manual for details
Automatic-Renewal Cancellation: please refer to the manual for details
Rescission: this option terminates the multipack's validity and any pending instalment will be automatically deleted. Please refer to the manual for details
Open the E-Commerce profile of the user without needing to login*
Change Email: shortcut to replace the user's email with a new one
Add CRM Note to the user's profile. It can be useful to have a history of customer-related information for sales purposes
*this option must be activated from the VAR portal: Configurations -> Api Keys -> Generate Api Key -> select the user and type "ECOMMERCE" in the description field. Once the procedure has been completed, the Self-Service Area/E-Commerce button will be displayed in the Shortcuts.
4. Customer's Purchases
The table below summarises the info available in the central part of the user profile
MAIN |
 In this section there is a summary of the purchases of the user, more specifically:
CustomisationsOn each row you will find the name of the purchased item, the starting date of validity and the expiry date and the price. These columns can be customised from the VAR portal: once logged in, click on Managed Environments -> View More -> Configurations -> Settings -> insert in the search field the code 10085 corresponding to the option Sell Summary Column List -> click on Modify to customise the list and the order of appearance (insert < or > before the name to show data in ascending or descending order) e.g. Name, Start>End, Amount, Paid means that in the Purchased section of the user profile the data will appear as follows: name, dates of start and end of validity, price and if the item has been paid or not. In case of multi-branch environments, it is possible to enable the option that shows all the customer's purchases, even in other branches. To do so, just access the VAR portal and click on Managed Environments -> View More -> Configurations -> Settings -> insert in the search field the code 10058 -> click on Modify to select YES -> click on OK to save. |
Symbols
 | the item is active |
 | the item is active but it hasn't been paid |
 | the item has expired |
 | the item has expired and it hasn't been paid |
 | the item has been refunded |
 | the multipack has been frozen |
 | the clock icon on the right opens the window for class booking (only for multipacks). To know more about class booking please click here |
 | The house icon means that the item was purchased in another branch. To see which, just hover the mouse on the icon and the name will appear |
SERVICES |

This section lists of all the services that have been purchased. Please refer to the manual for more info about this section.
Symbols
 | service not paid |
 | paid service |
 | expired service |
| expired service with pending payment |
 | refunded service |
PROSHOP |

This section provides a list of all the items purchased by the user, more specifically:
- ProShop items
- wallet top-ups
- purchased gift coupons
Please find more details about this section here.
Symbols
| unpaid |
| paid |
 | refunded |
COUPONS |
 In this section there is a summary of the user's coupons. It is also where new coupons can be assigned.
To know more about how coupons work, please click -> here.
Symbols
 | the coupon has a fixed value that cannot be edited. Coupons with a green icon have yet to be redeemed and are still valid |
 | the coupon's value can be decided by the operator. Coupons with a star have yet to be redeemed and are still valid |
 | the coupon has been used to apply a discount to the final amount and the payment has been completed. If the coupon has a percent value, the amount that has been discounted during the payment will appear under the value column |
 | expired. The coupon is past its validity and can no longer be used |
QUOTES |

In this section there is a list of the quotes provided to the customer. To see how to manage quotes click on -> quotes
Symbols
 | confirmed quote |
 | unconfirmed quote |
5. Classes and Access Records
AGENDA |

Printable list of:
- all the classes the user has booked
- all the classes of the course/s the user has enroled onto
- all the services the user has booked
It is also possible to filter them by date and change/delete future bookings.
For more information about the available options regarding the agenda, please click here
Symbols
 | booking of a class |
 | presence |
 | absence |
 | scheduled class of a didactic course |
 | booking of a service |
ACCESS RECORDS |

This section provides a list of all the user's access records (they can be filtered by date). Please note that the user's access records are shown in the access list the day after, as data are processed during the night.
It is still possible to check the current day's access records in the Access Control panel (see picture below) where they can be filtered by user
WAITING LIST |

This section provides a summary of the classes/courses the user is on the waiting list for.
The Day of the Class column provides details about how the client has been added to the waiting list:
- date of the class: the customer is on the waiting list for the specified class on the specified day and time
- entire course: the customer is on the waiting list for the whole course
- activity: the customer is on the waiting list for all the courses linked with the specified activity.
Symbols
 | on the waiting list |
 | on the list of attendees |
 | removed from the waiting list |
6. Cards, Bank details and Skills
In the INFO section of the user profile there is the possibility to add secondary info about the user. The following table provides a summary:
GROUP |

It is possible to add the user to a group (for discounts and promotions). Through the Create Group button a new family group will be created and the current user will be the main person all the other group members relate to. Alternatively, the user can be added to a pre-existing group through the corresponding button.
The purpose of creating a group is to activate discounts for family members. Discounts will be applied to every sale. This option must be activated by a SPORTRICK consultant. It is however recommended to use tags for automatic promotions, as explained in the manual).
SKILLS |

It is possible to add/delete users' skills for the enrolment onto courses. This way, the system will keep a history of the users' skills and progress. Please refer to the manual for the creation of skills.
Please note that once added, records will display the current date and it cannot be edited.
MEDICAL CERTIFICATE |
It is possible to add/edit/delete a medical certificate (if it is required for users to join the club's activities). Please note that this section is only useful to keep a history of medical certificates. For the creation of medical certificates please refer to the manual. Please note that it is also possible to avoid this procedure and simply change the date of expiry of the medical certificate, which will not be stored but simply replaced by the new one. Just click on Edit (under the profile picture) -> Notes -> Expiry date of the medical certificate.
CARD MODELS |

Card models are used for club/sport-association registration. Please note that they are not proximity cards for access control. The corresponding manual provides more info about card models.
CARD |
Please note that this section must be activated to be visible. It is not mandatory however, unless:
- more than one proximity card has to be linked with a single user profile (for example parents picking up children)
- a list of all the proximity cards assigned to a user is needed for record purposes
- customers scan QR codes to get in the club. In this case all the QR codes the customer scanned for each access will be listed in this section.
To enable this section, please log onto the VAR portal, click on Managed Environments -> View More -> Configurations -> Settings -> type in the search field the code 10125 -> click on Modify -> untick "Use default value" -> select YES -> click on OK.
Through the Delete button it is possible to dissociate a card from a user profile so that it can be assigned to somebody else 
Through the Disable button it is possible to disable a card (for example if a person has lost it) and reactivate it at any time
If the Card section has not been enabled, it will still be possible to check the customer's proximity-card number by clicking on the Edit button under the profile picture and then on the Note section.
REFERRAL |

It is possible to add new or potential customers referred by the user. Please click here for more info.
SDD INFO |

Bank details used for payments via Sepa Direct Debit. Please refer to the corresponding manual for more info.
AUTOMATIC PAYMENTS |

This section shows a list of the customer's cards used registered for automatic payments. The date corresponds to the day the card was registered in the system and it cannot be edited. To activate recurrent payments on the customer's credit card, please contact sales@sportrick.com